Adding Photos to Your Travel Animation with anim8map
Last updated: March 24, 2026
Animated travel maps become even more compelling when you add your personal photos. Your viewers get to see the stunning landscapes, delicious meals, cultural landmarks, and candid moments that defined your adventure. A simple route visualization is transformed into a rich storytelling experience.
This article is a step-by-step guide to creating a travel route animation with your own photos.
- More than one photo per stop: Take advantage of anim8map's ability to display multiple photos for each destination. This creates a more complete visual story for each location.
- Automatic cropping and zooming: Use the built-in tools to crop and zoom your photos.
- High-quality images matter: Always upload the highest quality photos available. Low-resolution images will appear pixelated and impact the quality of your animation.
- WhatsApp and messenger photos: If you're using photos shared by friends, ensure they are high-quality. Compressed messenger photos often lose significant quality. For WhatsApp users, make sure to send and receive photos in high definition. You can learn more about sending HD images in WhatsApp to maintain the best quality for your animation.
Getting Started: Enable Photo Support
When you create your travel animation in anim8map, you first need to enable the photo feature. Look for the "Add my photos" setting in the first step of the video editing process.
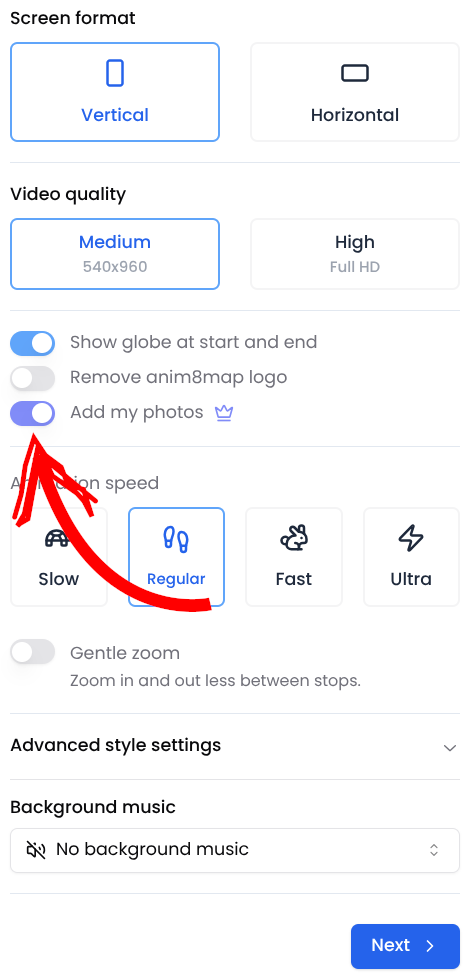
Toggle on the "Add my photos" option to unlock the photo feature. With this setting, anim8map prepares your project to include images alongside your animation.
Once you've enabled photo support, click "Next" to proceed to adding your travel stops and destinations.
Adding Your Stops
You now add all stops of your route. No need to add photos in this step. After you added all your stops, click "Next" again.
Adding Your Travel Photos
After following the previous steps, anim8map will take you to the photo upload interface. This is where you can now add your personal photos to each stop on your travel route.
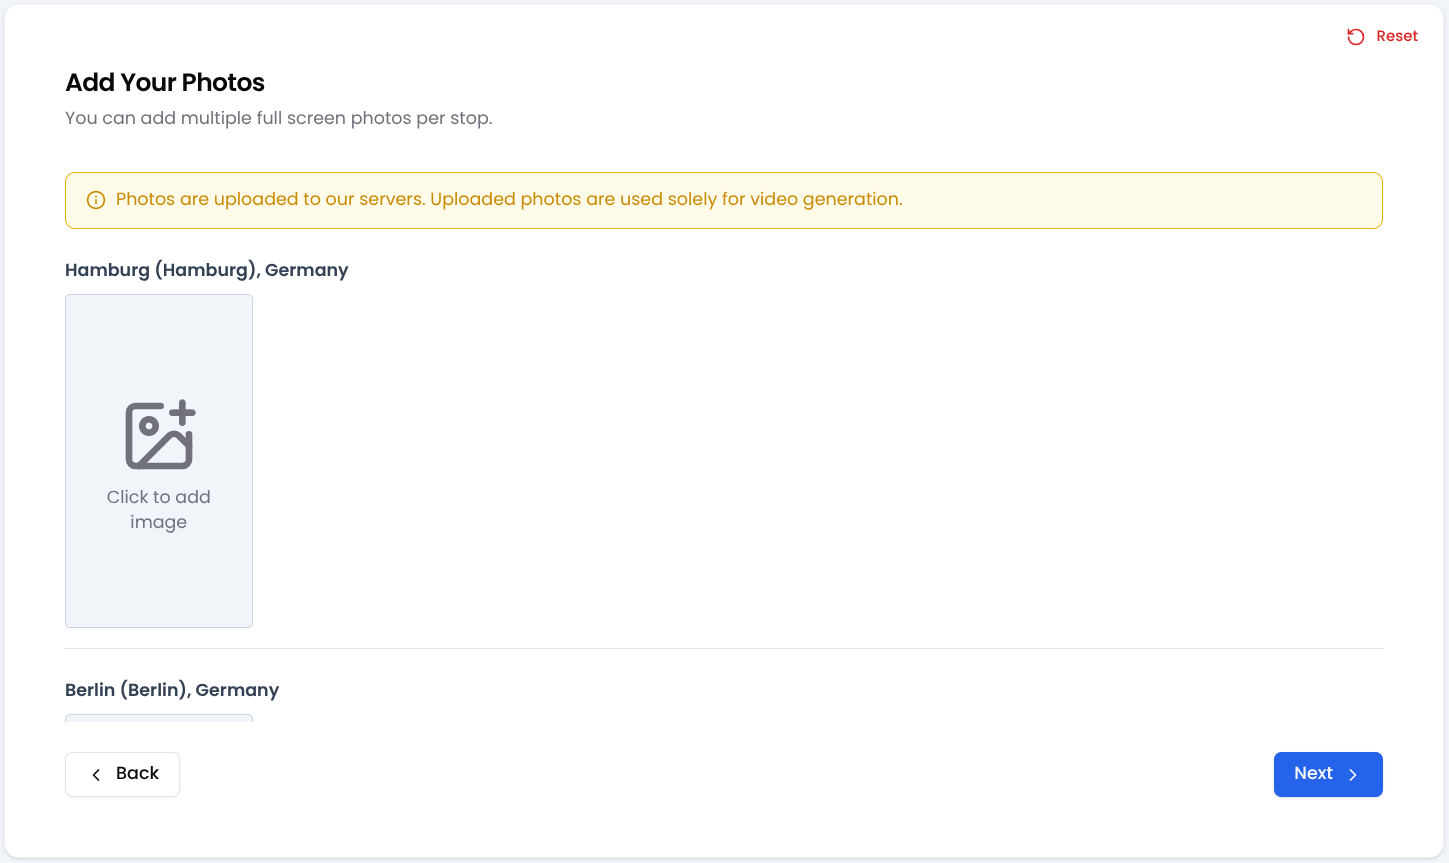
The photo page allows you to upload one or more images for each destination. When your final travel animation plays, these photos will be displayed one by one as the animation reaches each stop.
This feature is particularly great for longer trips with many destinations, as it allows viewers to visually experience each location through your perspective.
How Many Photos You Can Add
With one of our Premium plans, you can add up to 300 photos per video. Other than that, there is no limit on the number of photos you can add per stop.
What Happens To Your Photos
To learn more about how we process your photos, please check our blog article How We Process Your Photos on anim8map here.
Photo Upload Tips and Best Practices
Consider these important tips when uploading your photos:
When selecting and organizing photos for your animated travel map, think about creating a cohesive visual story. Choose images that best represent each destination and tell the story of your experience there. Include a mix of landscape shots, local cuisine, cultural highlights, and personal moments. Variety keeps viewers engaged and provides a well-rounded representation of your experience.
With anim8map's photo feature, you're capturing both the geography and the memories of your adventure in a single video - perfect for sharing on social media, travel blogs, or keeping as a personal memory of your travels.
Ready to get started?
Create your first video for free
And if you have any other questions around our photo feature, please don't hesitate to contact us here!
 YouTube
 TikTok




%20--%3e%3csvg%20version='1.1'%20id='Ebene_1'%20xmlns='http://www.w3.org/2000/svg'%20xmlns:xlink='http://www.w3.org/1999/xlink'%20x='0px'%20y='0px'%20width='120'%20height='80'%20viewBox='0%200%20120%2080'%20style='enable-background:new%200%200%20120%2080;'%20xml:space='preserve'%3e%3cg%20id='export-badges'%3e%3cg%20id='production-final'%20transform='translate(-36.000000,%20-6018.000000)'%3e%3cg%20id='card_google_pay'%20transform='translate(36.000000,%206018.000000)'%3e%3cpath%20id='Rectangle-11'%20class='st0'%20style='fill-rule:evenodd;clip-rule:evenodd;fill:%23FFFFFF;'%20d='M4,0h112c2.2,0,4,1.8,4,4v72c0,2.2-1.8,4-4,4H4c-2.2,0-4-1.8-4-4V4C0,1.8,1.8,0,4,0z'/%3e%3c/g%3e%3cg%20transform='translate(0.000000,400.000000)%20scale(0.100000,-0.100000)'%3e%3cpath%20d='M726.4-56417.9c-21.4-5.5-41.9-28.7-45.5-51.8c-1.7-10.4-1.7-10.4,6-10.4c23.4,0,50.1,31.1,47.7,55.6%20C733.9-56416.2,733.7-56416,726.4-56417.9z'/%3e%3cpath%20d='M903.7-56440.3c-1.9-0.5-10.8-1.7-19.8-2.4l-16.4-1.7v-126.2v-126.2h10.8h10.8v52.8v52.8l28.4,1%20c24.1,0.7,30.1,1.7,41.4,7c18.5,8.7,29.9,19.3,37.8,35.4c5.5,11.8,6.5,16.9,6.7,35.4c0,17.8-1,23.6-5.5,33%20c-7.5,14.9-23.6,28.9-39.3,34C947.1-56441.7,911.5-56438.4,903.7-56440.3z%20M956-56467.5c19-9.9,29.1-31.3,26-54.4%20c-4.3-33-26.5-49.6-66.2-49.6c-10.4,0-20.5,0.7-22.6,1.4c-3.4,1.2-3.9,8.4-3.9,53.7c0,28.9,0.7,53.2,1.9,54.2%20c1,1,13.7,1.4,28.2,1C940.8-56462,947.8-56463.2,956-56467.5z'/%3e%3cpath%20d='M623.1-56487c-48.7-12-67.5-74-42.6-140.9c7.5-20.2,25.3-47.9,38.5-59.7c12-10.8,23.1-12,43.4-4.3c16.1,6,34.7,6,48.4,0%20c13.2-6,28.2-6,38.1-0.2c9.9,6.3,24.8,26,35.4,47.7c8.9,17.8,10.1,22.4,6.7,22.4c-1.2,0-6.7,4.1-12.5,8.9%20c-28.7,24.6-28.9,70.1-0.5,94.9l8.7,7.7l-10.1,9.2c-19,16.6-44.3,21-69.9,11.6c-21-7.9-25.1-7.9-44.6-1.2%20C643.6-56484.9,636.1-56483.9,623.1-56487z'/%3e%3cpath%20d='M1053.1-56512.3c-11.6-3.1-25.5-9.9-27.2-13c-1.7-2.4,5.1-18.1,7.2-16.9c27.2,14,48.4,16.4,63.6,7.7%20c10.1-5.8,19-22.6,19-35.9v-9.9l-23.6-2.6c-13-1.7-29.9-5.3-37.6-8.2c-40-15.4-55.2-61.7-29.6-90.6%20c10.4-11.8,23.8-17.6,41.4-17.6c15.4,0,33.7,7,43.8,16.6c2.9,2.7,6,5.1,6.5,5.1c0.7,0,2.2-4.3,2.9-9.9c1.7-9.6,1.7-9.6,11.6-8.9%20c7.2,0.5,9.6,1.7,8.9,4.3c-0.2,1.9-1.4,34.4-2.4,72.3c-1.4,65.3-1.7,69.1-7.2,80.2C1117.9-56514,1086.8-56502.9,1053.1-56512.3z%20M1115.7-56623.4c0-25.1-2.2-31.8-13.7-42.6c-20.2-19.3-52.3-17.8-62.6,2.9c-4.8,9.6-3.9,28.4,1.9,37.8%20c8.7,14,34.2,23.6,64.3,24.6l10.1,0.2V-56623.4z'/%3e%3cpath%20d='M1160.3-56516.2c0.7-1.2,16.1-40.7,34-87.2l32.3-84.8l-7-14.7c-9.6-20.5-24.3-38.1-39.7-47.5%20c-7.5-4.3-13.5-9.2-13.5-10.8c0-5.1,5.5-15.2,8.2-15.2c5.3,0,27,14.2,35.7,23.4c12,12.3,28.9,42.4,40.2,71.8%20c5.3,13.2,19.8,50.6,32.3,83.1c12.5,32.5,25.1,64.8,27.9,71.8l5.1,12.5h-11.8h-11.8l-7-18.6c-4.1-10.4-15.7-42.9-26.3-72.3%20c-17.6-49.9-22.4-60.2-22.6-49.4c-0.2,2.2-11.8,34.4-26,71.5l-26,67.5l-12.8,0.7C1162.7-56513.8,1159.1-56514.3,1160.3-56516.2z'%20/%3e%3c/g%3e%3c/g%3e%3c/g%3e%3c/svg%3e)
'%3e%3cg%20id='card_google_pay'%20transform='translate(36.000000,%206018.000000)'%3e%3crect%20id='Rectangle-11'%20fill='%23FFFFFF'%20x='0'%20y='0'%20width='120'%20height='80'%20rx='4'%3e%3c/rect%3e%3cg%20id='download'%20transform='translate(18.000000,%2025.000000)'%3e%3cpath%20d='M39.052,5.27%20L39.052,13.436%20L44.088,13.436%20C45.288,13.436%2046.28,13.032%2047.064,12.226%20C47.87,11.422%2048.274,10.462%2048.274,9.352%20C48.274,8.264%2047.87,7.316%2047.064,6.508%20C46.28,5.682%2045.288,5.268%2044.088,5.268%20L39.052,5.268%20L39.052,5.27%20Z%20M39.052,16.31%20L39.052,25.782%20L36.044,25.782%20L36.044,2.396%20L44.024,2.396%20C46.05,2.396%2047.77,3.07%2049.188,4.42%20C50.628,5.77%2051.348,7.414%2051.348,9.352%20C51.348,11.334%2050.628,12.99%2049.188,14.316%20C47.794,15.646%2046.07,16.308%2044.022,16.308%20L39.052,16.308%20L39.052,16.31%20Z%20M54.388,20.884%20C54.388,21.668%2054.72,22.32%2055.386,22.844%20C56.05,23.364%2056.83,23.626%2057.722,23.626%20C58.988,23.626%2060.114,23.158%2061.106,22.224%20C62.1,21.286%2062.594,20.186%2062.594,18.924%20C61.656,18.184%2060.348,17.814%2058.67,17.814%20C57.45,17.814%2056.43,18.11%2055.614,18.698%20C54.796,19.286%2054.388,20.012%2054.388,20.884%20Z%20M58.28,9.254%20C60.504,9.254%2062.258,9.848%2063.546,11.034%20C64.83,12.222%2065.474,13.85%2065.474,15.918%20L65.474,25.782%20L62.596,25.782%20L62.596,23.562%20L62.466,23.562%20C61.222,25.39%2059.566,26.306%2057.494,26.306%20C55.73,26.306%2054.252,25.782%2053.064,24.738%20C51.876,23.692%2051.282,22.386%2051.282,20.818%20C51.282,19.162%2051.908,17.846%2053.162,16.866%20C54.416,15.886%2056.088,15.396%2058.182,15.396%20C59.966,15.396%2061.44,15.722%2062.594,16.376%20L62.594,15.688%20C62.594,14.644%2062.18,13.756%2061.352,13.028%20C60.5542391,12.3101177%2059.5151104,11.9194625%2058.442,11.934%20C56.762,11.934%2055.434,12.64%2054.452,14.058%20L51.804,12.39%20C53.264,10.3%2055.424,9.254%2058.28,9.254%20Z%20M81.986,9.778%20L71.946,32.838%20L68.84,32.838%20L72.568,24.77%20L65.964,9.778%20L69.234,9.778%20L74.008,21.276%20L74.072,21.276%20L78.716,9.776%20L81.986,9.778%20Z'%20id='Shape'%20fill='%235F6368'%20fill-rule='nonzero'%3e%3c/path%3e%3cpath%20d='M26.896,14.268%20C26.896,13.322%2026.816,12.408%2026.664,11.536%20L13.976,11.536%20L13.976,16.712%20L21.244,16.712%20C20.9430287,18.3831748%2019.9719035,19.8586493%2018.556,20.796%20L18.556,24.156%20L22.894,24.156%20C25.434,21.816%2026.896,18.356%2026.896,14.268'%20id='Shape'%20fill='%234285F4'%20fill-rule='nonzero'%3e%3c/path%3e%3cpath%20d='M13.976,27.4%20C17.608,27.4%2020.664,26.21%2022.894,24.158%20L18.556,20.796%20C17.35,21.608%2015.796,22.082%2013.976,22.082%20C10.468,22.082%207.488,19.718%206.424,16.534%20L1.956,16.534%20L1.956,19.996%20C4.24184797,24.5371718%208.89197185,27.4022981%2013.976,27.402'%20id='Shape'%20fill='%2334A853'%20fill-rule='nonzero'%3e%3c/path%3e%3cpath%20d='M6.424,16.534%20C5.86273911,14.8652626%205.86273911,13.0587374%206.424,11.39%20L6.424,7.928%20L1.956,7.928%20C1.0114615,9.79834617%200.520226421,11.8646851%200.522,13.96%20C0.522,16.13%201.042,18.18%201.956,19.994%20L6.424,16.532%20L6.424,16.534%20Z'%20id='Shape'%20fill='%23FABB05'%20fill-rule='nonzero'%3e%3c/path%3e%3cpath%20d='M13.976,5.842%20C15.96,5.842%2017.736,6.522%2019.136,7.858%20L19.136,7.86%20L22.976,4.024%20C20.648,1.856%2017.608,0.524%2013.978,0.524%20C8.89441559,0.523321579%204.24440402,3.38760491%201.958,7.928%20L6.426,11.39%20C7.49,8.206%2010.47,5.842%2013.978,5.842'%20id='Shape'%20fill='%23E94235'%20fill-rule='nonzero'%3e%3c/path%3e%3cpolygon%20id='Shape'%20points='0%200%2082.57%200%2082.57%2036%200%2036'%3e%3c/polygon%3e%3c/g%3e%3c/g%3e%3c/g%3e%3c/g%3e%3c/svg%3e)